Cooking here is:

My photo
First food I have ever made was from the Sesame Street book and I was maybe 7 years old, It was a damn good soup!

Tuesday, April 26, 2011

Caribbean spiced steak with coconut rice

Finally it is warm! And the grilling season is open.
Actually we grill all year long, but its different when you can smell it in the warm air and enjoying the time outside.

I think I love everything and anything from the grill, the flame, the smoke the chard. Meat, fish, fruits or veggies. All taste like summer and fun-time. It's really amazing how different smells, or different tastes can in one second  bring us years back to places and times we thought we have lost forever. Bringing back memories so distant yet so clear and precious. That's what the smoky, meaty smell of a barbecue does for me, that's why I love it.

I need to cheat a bit, all because when I did this recipe it was still kinda coldish and all I could think of was some sunny beach and warm, lapis lazuli sea. So I thought of warm Caribbean islands and decided I need to make a feast inspired by those places.

Grilled Caribbean spiced steak with coconut rice  MMmMMmmmMmMmm!


you need:

grill or heavy grilling pan
1 sauce pan
1 bowl or plastic storage bag
1 pot
cutting board
sharp knife

ingredients:


large flank steak or london broil
1 cup orange juice
2 tablespoons olive oil
spicy jamacian jerk seasoning ( scotch bonnet pepper-very hot, pimento cherry pepper, soy sauce, vinegar, brown sugar, garlic, onion, thyme, ginger, black pepper, smoke liquid, lemon juice)
salt
pepper
handful fresh cilantro
1 cup white rice
1 cup coconut milk
1 cup water
pinch of ground coriander


Start with marinating the meat, it takes some time to absorb the flavor. I used beef flank steak, but really any kind of beef steak cut will do. Salt and pepper the meat, do it in a large bowl or storage zip bag. Add  2 table spoons of jerk seasoning (if you cant find it in any store or delicatessen around you, try to make it yourself using the ingredients above). Rub it good into the meat, add orange juice and olive oil and fresh chopped cilantro.


This will make a great fragrant marinade. Leave the meat inside the refrigerator for at least 1 hr.
Make sure you take it out the fridge about 15-20 min. before grilling, its good when meat is closer to room temperature when you start to process it.
In the meantime cook the rice. Into a sauce pan add 1 cup rice, 1 cup water and 1 cup coconut milk (remember coconut milk is the water with and the milky shreds, do not buy the sweetened one). Spice it up with salt and a pinch or ground coriander. Coconut will give the rice this nutty, distinct flavor. It really reminds me of the rice with saffron, there is something those two have in common. And yes both makes the rice taste amazing.


The secret to perfectly cooked rice is the measurements 2:1. Two parts liquid to one part rice. Bring it up to a boil, cover and turn the heat down to medium low. Leave it to cook slowly for 15-20 min. DO NOT STIR, DO NOT OPEN THE COVER AND CHECK! Just let it cook. After 15 min you can take it off the stove and leave to rest and end up cooking in its own steam. This way you will have a perfectly cooked rice, every time you make it! When you are ready to serve it fluff it with fork, thats all.

Now your meat is ready to be grilled! Put it on the hot grill or hot grilling pan on your stove. Grill it 5-7 min on each side for medium raw, depends how thick is your steak and how you like it best. I like it nice and chard on the outside and pink and juicy on the inside. Remember once its done, take it off the grill and leave it to rest for 2-4 min. just to let the juices cool down. Cut it and serve with the coconut rice, the spicy and fruity marinade and velvety rice compliment each other in  a perfect culinary way. Match made in heaven! Serve it with avocado or mango and cucumber salad, or like I did with green beans and cherry tomatoes with a splash of balsamic vinaigrette.


So simple, just few extra ingredients can turn meat and rice into an exotic feast!


Monday, April 18, 2011

2 classics : fish and chips and bouillabaisse, so different but both so good!

My sister asked me for a fish recipe, spot on because I always promise myself to make more fish dishes, but at the end we always end up with red meat on the plate. Unless it's a lobster sale week :)

Even though we live so close to the coast and New England is well known for the fish delicacy, is not so easy to find fresh seafood around here. I do not want to start this post with complaints, but it is really better to eat seafood not so often but fresh, than some frozen blocks of ''who knows what', seasoned and breaded by ''Captain Fishy''.
Don't get me wrong, frozen fish in many cases is better and fresher than, what we can get in the fish section of our local supermarket. Shrimp, calamari, squid, king crab, prawns, octopus etc... those are usually safe to buy frozen, because they get blast-frozen on the boat, or right after the fisherman gets to the shore with their catch.
But if you can find and afford from time to time a fresh, not frozen ''frutti di mare'' go for it!
Just remember few tips:  keep your eyes open, nose sharp and read labels!
Make sure your fish is wild caught and not farmed. If you buy it as FRESH, look your fish deep in the eyes, if they are foggy, stay away from it. The skin should be firm and shiny. Fish should smell like an ocean water, delicate, I would dare to say, should almost not smell at all.
Remember about your local varieties of fish, ask in your seafood shop what is in season. Don't forget about freshwater fish, shellfish or crawfish, they are as delicious as their cousins from salty waters.

But lets go back to the business, I decided to prepare two different dishes, that I hope will satisfy everyone:

Fish and chips: English tasty classic, homemade fries sprinkled with sea salt and homemade tartar sauce.


Bouillabaisse: delicate fish soup, colorful and sophisticated but will surely satisfy your seafood cravings.


you need:
sharp knife
plastic cutting board
heavy soup pot
heavy skillet
4 flat containers or plates
baking sheet
aluminum foil
small bowl
big plate
paper towel

ingredients:

fish and chips:
6 flounder fillets (can be whitefish, tilapia, cod)
sea salt
pepper
1 egg
splash of milk (1-2 tablespoons)
1 cup all purpose flour
1 cup panko (japanese breadcrumbs) or regular breadcrumbs 
pinch of paprika
pinch of cayenne pepper
handful fresh parsley
4-5 big potatoes
2 cups and 2 tablespoons sunflower oil or corn oil

tartar sauce:
2 tablespoons mayo
1 tablespoon mustard
1 teaspoon horseradish
1 tablespoon  diced onion
1 clove of garlic minced
1/2 teaspoon garlic powder
2-3 little cornichon pickles
1 tablespoon capers
pinch of salt
fresh pepper
1/2 teaspoon sugar
1 teaspoon fresh lemon juice

Preheat your oven to 450°F (230-250°C), peel your potatoes and cut into wedges or thicker fries (you can leave the skin on for the rustic taste and look). Place aluminum foil on baking sheet, toss your fries with 2 tablespoon on oil sprinkle some salt and pepper and place in the oven for 20 min. Or until fork tender and golden brown (broil for last 3-4 min.).


Fries made like this are very good and contain 100% potato, unlike the  fries you buy in the freezer section of your store.

Prepare your breading station, place 4 plates one after the other. First with flour, second with whisked together: egg, milk, a pinch of paprika and cayenne pepper, third with panko bread mixed with chopped parsley and fourth empty.
Fresh parsley will give unexpected color and fresh taste to your fried fish.


The fish fillets season good with salt and pepper and start the breading action.
First cover  with flour, next dunk it into the egg mixture, next cover with crispy panko breadcrumbs and at the end place on a empty plate to rest. Do exactly the same thing with all you fish pieces and let them rest for few minutes.


In a heavy skillet heat up 2 cups of oil (let the oil cover the skillet up to 2 inches high, about 3-4 cm). You wanna be sure, that you have enough oil in the skillet, so the fillets will  float. This way the fish will fry fast, become golden brown and crispy. Heat your oil on medium high heat, until really hot (320°F or so). Fry it with caution, depends on how thick your fillets/pieces are, will take you from 1-2 min. on one side and 30 sec.-1 min. on the other side. So pay close attention and don't burn the fish. Use a heatproof spatula to turn the fish on the skillet. Ready fillets place on a plate with paper towel that will trap the access oil. Do not overcrowd the skillet, fry max 2-3 fillets at once. Don't let the oil temperature drop down to low, this will make your fish soggy and oily, you really do not want that!

You can place your fish in a warm oven to keep it crisp, while you are making the tartar sauce.
To a small bowl add: mayo, mustard, horseradish, garlic powder and a squeeze of fresh lemon juice.
On the cutting board chop very thinly: onion, cornichon pickles, capers and garlic.


Add them into the mayo mixture and really mix well. Taste it and add salt, pepper, lemon and a bit of sugar according to your taste.


Homemade tartar sauce rocks and takes so little to make it.


Sprinkle sea salt over the chips, eat your flaky fish with a bit of tartar sauce and a cold beer! It's a feast even for those, who don't appreciate the glorious taste of seafood. 


ingredients:

bouillabaisse:
4 pieces of sea bass or any other fish (best to have bones and head for stock)
assorted seafood : calamari, crabs, sea urchins, shrimp, octopus 
(I used frozen seafood medley: calamari, clams, shrimp and crab meat)
2 big potatoes diced or sliced
1 cup small grape or cherry tomatoes
1 cup diced onion
1 cup diced fennel bulb
1 cup diced celery
1 small carrot (optional)
1 small parsnip (optional)
2 cloves garlic
1/4 teaspoon saffron threads
1/4 cup olive oil
1 cup dry white wine
4 cups water
1 vegetable bullion cube (optional)
1 teaspoon thyme
2 bay leafs
2-3 allspice corns
2-3 black pepper corns
handful fresh parsley
half lemon plus lemon zest
salt

Its a one pot meal so all you need is a heavy soup pot, or a round dutch oven (I use a dutch oven for almost anything! It's so worth buying ). Heat up oil over medium heat. Cook onion, garlic until translucent. Add thyme sprigs and let it release the natural oils.


Add a cup of wine and water (add bullion cube if you use it), add fish bones and the head (a perfect fish stock is when you use lobster or crab shells, they give a distinct, almost sweet sea taste to a broth). Add diced celery, fennel, parsnip and carrot (dice them or leave whole so you can easily take them out later). Cut the cherry tomatoes in half's and squeeze out the seeds and juice, when seedless add to your stock. Add the bay leafs, allspice, few sprigs of parsley and saffron.


Bring to a simmer and cook, covered for 30-40 mins.
After the stock is ready, take out the fish head, bones, bay leaf, parsley and thyme sprigs, carrot and parsnip (if you left them in 1 piece). Add salt, black pepper and a bit of lemon zest. Next add diced potatoes and let it cook- simmer for another 10 min. When almost tender add the actual fish meat and seafood medley. Cover it and cook it no longer than 5-7 min.


Do not overcook the seafood, it will become tough and rubbery. For this soup you can really use any kind of fish or seafood, sky is the limit. At the very end squeeze fresh lemon juice and sprinkle with fresh chopped parsley. Serve with sourdough bread and good wine. 


Thursday, April 14, 2011

Golden and delicious... stuffed roasted pork.

We all faced this problem at least a few times in our culinary lives, a piece of meat in the fridge that just doesn't inspire us, but we need to use it. Tough one.
For me this kind of culinary boredom represents pork loin and chicken breast, thats why I try and try and try to do something new with those two.

This time I had a leftover nice big piece of a pork loin. Well at this point I had only about a pound left (for my dear European friends: less than half a kilo). For me this amount is rather small, but I'm aware, this could feed a family of 4. Growing up in a big family, that loves to eat,  totally took away from me the ability to cook and think in small amounts.
I needed also something good, either warm or cold and preferable edible the next day on a sandwich.
Roast, yes! thats always good and even better the next day on a slice of dark bread with a good grainy mustard.
But pork loin tends to dry out fast, thats why I needed to add some tasty stuffing that could keep the moisture inside and give an extra flavor boost to my boring piece of meat.

This way the creation of roasted pork with a simple stuffing and grainy mustard started to become true.


you need:
skillet
heavy roasting pan or dutch oven
cooking twine
kitchen scissors or sharp knife
small bowl

ingredients:
pork loin (1-2 pounds, 1/2-1kg)
1 carrot
1 celery stalk
small yellow onion
2 cloves garlic
1 slice bread (white preferable, can be toast bread )
1 tablespoon French mustard
 fresh parsley
1 bay leaf
1 dry tomato
2 allspice corns
1 glass water or chicken broth 
1 tablespoon corn oil or vegetable oil (try to use oil made from one plant rather then mixes )

for the dry rub:
salt
pepper
paprika
dry marjoram
dry garlic

Start with your meat, wash it with cold water and dry very good with paper towel. In a small container mix the spices for the dry rub, and massage the pork good with them. Put the pork aside to rest 10 -15 mins. 
Start to prepare the stuffing. Cut celery, onion, carrot, garlic and fresh parsley in a very small pieces. Saute them on a hot skillet for 4-5 minutes, just to make onion translucent, add a pinch of salt and pepper.


Cut the bread slice in a small pieces and add to the skillet at the very end, just to mix it with the warm veggies. Transfer the warm stuffing into a bowl and add the tablespoon of a good French, grainy mustard. That will give the mixture a new dimension and a nice punch. Let it cool a bit.

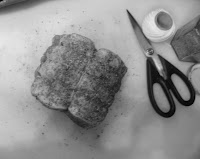
Now take your meat, turn it to the side (the narrow side up ) and with a sharp knife make a deep pocket inside it (careful do not cut all the way through the meat).


When the pocket is ready, start filling the pork with the fragrant stuffing. Use the best tools you have: your hands,  to really fill the meat out but do not overload it. 


Now take the kitchen twine (or a thick thread) and start to tie the meat, like you would tie a present with a ribbon. Make sure the pocket is closed tight so your precious stuffing won't fall out.


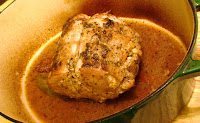
Now in the same skillet you made the stuffing or in a dutch oven, heat up the oil and on medium high heat, brown your meat on every side. When is nice and golden, add a glass of water or chicken broth, bay leaf, allspice corns and dry tomato.


Cover the dutch oven (or a heavy roasting pan with aluminum foil) and place it with the meat inside the preheated to 450° F(230-250° C) for 30-45 min. (The time really depends on what kind of oven you have and how big and thick piece of meat you use). The best way to check if your meat is ready, is to use a meat thermometer, stick it in the thickest part of the roast and check the temperature.


Remember when you take your roast out LET IT REST before slicing. The liquids inside the meat has to cool down a bit, if not you will cut it and all the juicy goodness will end up on your cutting board and you will end up with a dry piece of pork. The sauce that is left on the bottom of your pan, reduce for 5-7 minutes and use as a sauce for the warm meat.


Serve the pork with mashed potatoes and warm asparagus with lemon vinaigrette or warm broccoli salad with  sweet asian sauce. The next day slice it thin and make a delicious cold sandwiches with hearty arugula.
Enjoy!


Wednesday, April 6, 2011

Coffee infused crepes with whipped cream and blueberry jam! Instant classic!

Its been several days, that I had one thought in my mind COFFEE!
Yes I needed to cook something with it, I was thinking ribs or maybe, pork tenderloin...tiramisu...boooring!!!

I do treat my breakfast seriously, we eat it almost everyday, I rather go with savory tastes: omelets, french toasts, BLT's (bacon, lettuce, tomato sandwich ) etc.
I had also an idea to make a little duel between:  french crepes, american pancakes, polish racuchy and russian bliny and later post it in here. So you guys can make them all, and decide which one you like the most (this will happen soon, but not today, so be patient please ).

So in my head: coffee, crepes, coffee, coffee, this idea blended together...EUREKA! 
I made coffee infused crepes, with blueberry jam (unfortunetly I didn't have fresh berries >.< ), all bound together with fluffy whipped cream! I love them, my hubby loved them too. He said: Instant classic.
I try to be modest, but they are heavenly good,  it all just blended perfectly together.
Beautiful breakfast all that you need, to start your day. 
And hey! for those who do not like coffee, give this recipe a chance, the coffee aroma is just in the background wondering around, stimulating your senses! Do it, do it do it! 


you need:
non-stick skillet
2 large bowls
whisk or mixer
sifter

ingredients:

2 large eggs
1 cup all purpose flour
1 cup milk
2 up to 2 and 1/2 cups mineral sparkling water 
1 teaspoon salt
1 teaspoon good, ground espresso 
1 teaspoon vanilla extract
1 cup heavy cream
1 up to 1 and 1/2 tablespoon of sugar
blueberry jam or fresh blueberries

In a large bowl mix eggs, milk, salt, vanilla extract and a teaspoon of ground espresso, use a good quality coffee
it really makes a difference. Good coffee smells beautiful and leave roasted almost chocolaty flavor.
Sift in 1 cup of flour, stir it in good so you don't have any lumps. Start adding sparkling water, 1 cup mix well, another cup mix well again. Your butter must be runny, almost milky, not thick and heavy. With the coffee bits inside, your mixture will have sexy brown dots and a beautiful aroma.


If u take out coffee and vanilla this is a perfect recipe for simple crepes, you can make any day of the week.
Many recipes call for clarify butter or vegetable oil, I do not add that inside my crepe mixture. If you use a good non-stick skillet you do not need any oil, when doing your golden, delicious treats.
I also do not add sugar, because it makes your crepes stick to the skillet and burn faster. I think your filling should be sweet enough so, you don't need to add sugar to the butter. 

Once your mixture is well blended, leave it to rest for 20-30 min. Flour expands, so your butter may get a bit thicker, if it happens just add more water. By the way, if you don't have sparkling water on hand, use a regular mineral water (Water makes crepes light and almost elastic, if you add only milk they tend to be a bit hard).
The secret to fry them is a good non-stick pan (teflon or ceramic - I use ceramic and its perfect! ). Do not add too much of your mixture on the pan, just enough to cover the bottom. Your pan has to be hot, but do not fry them on high heat. Work the mixture around, by holding the pan and rotating it around, this will help you cover the bottom evenly. When you see that the edges of your flat friend are rising off the pan, time to flip it over.
It really takes only 1-2 min on one side and 1/2 a min on the other side.


After you are done frying your crepes, beat up the heavy cream using your mixer or whisk add sugar and  whisk until nice and stiff.
Do not use the artificial stuff from the can, this is so disgusting and to make a real deal whipped cream takes so little. Do not make it too sweet, that will overpower the other pretty things going on, on your plate.
When all is ready, add your heavy cream on to your crepes, then roll'em, fold'em, flip'em and finish with a dollop of blueberry jam or a handful of blueberries.


Delicate coffee taste, with a fluffy cream and blueberry jam, that goes perfectly with coffee, don't ask me why it just does! That's a match made in  heaven. Perfect beginning of a lazy Sunday or any day of the week.
Yes kids try this at home, you will never regret that! 


party pleasers, appetizers, amuse bouche...

I know, small foods again, but i really love them.
1 bite-size and again french spot on name, amuse bouche: mouth pleaser!
You eat them twice, first with your eyes and again with your mouth therefore they must be cheerful, colorful tasty and sexy.
Classic amuse bouche is a 1bite size appetizer, crowd pleaser, but lets not be so conservative about it.

Perfect as a starter for any kind of party, girls-get-together, house opening, birthday, evenings together and so much more.... Stand or sit, at the table or in the garden, maybe balcony...
They are easy to make, I bet I could make an amuse bouche / appetizer from ingredients that any of you have in their home at any time! Because sky is the limit. You can use your culinary imagination, marry different kind of flavors together and present them! Dont forget a nice cocktail or wine to go along with them.

May I present you my personal spin on:

deconstructed caesar salad topped with a tiny, spicy meatball


and


an asian insipred chicken-squash salad in a wonton basket


you need:
skillet / soute pan
muffin tin
silicone mate or parchment paper
roasting pan
2 mixing bowls
small container or bowl to mix spices
aluminum foil
baking sheet
whisk or a small jar with a lid

ingredients:

caesar salad in a cheese bowl:
half romaine lettuce
2 cups freshly grated Parmesan cheese
4 tablesoons extra vergin olive oil
2 tablespoon lemon juice
1 teaspoon yellow mustard (dijon)
1 clove garlic
salt, pepper (I do not write how much salt and pepper you need, because everyone uses it according to their taste)

spicy meatballs
1/2 lb (~ 220g) lean ground beef
1/2 lb (~220g) lean ground pork
(meat can be swaped with ground turkey or lamb)
1 egg
1/2 onion
2 cloves garlic
1 teaspoon paprika
1 teaspoon ground cumin
1 teaspoon ground corriander
1/2 teaspoon cayenne pepper
1 teaspoon fresh or dry oregano
handful of fresh parsley
salt, pepper

In a large mixing bowl combine meat with finely chopped onion, garlic and most of your parsley (rest keep for garnisha at the end). Mix all your spices  that you're planning to use in a little bowl, that way is so much easier when you cook, you can make any kind of spice mix yourself. Saves you time and will keep your spice rack clean, cause you do not need to worry about opening jars, cleaning hands, changing spoons.


Add your spice mix into the bowl with meat, add lightely beaten egg and mix it all well, again please dont squeeze the meat dry :) Let the meat rest for at least 15-30 mins or so.
Form nice small meatballs, place them next to each other in a deep baking dish. Put for 30-45 min. into peheated oven  at 400° F (220° C).
Cover your meatballs with aluminum foil add a bit of liquid on the bottom of roasting pan (can be plain water) that will make them cook evenly. After  30 min. check if the meatballs are nicely done inside. Uncover and leave them for another 10 min. or so, to broil (grill) in your oven, that will give them nice color. You do not need any breadcrumbs or bread, those are simple, not heavy and fat meatballs. But will satisfy you, I promise.
Take them out and let cool, in the meanwhile start preparing salad and cheese bowls.

Wash and cut (yes you can use knife to cut your romaine lettuce into nice small pieces) lettuce, if you didnt find romaine, use iceberg instead. It must be a lettuce that can hold the shape and dont get too soggy fast. Make the dressing in a separate container, mince garlic, add olive oil, sqeeze fresh lemon, add mustard, salt and pepper, whisk it all together until it forms an emulsion (you can use a small jar add all inside close the lid and shake it good until well combined. A jar can be also a super cocktail shaker just add crashed ice).
Wait to dress the salad at the very end, when everyting else is ready to assemble.

Ok now the tricky part, yes I know that every caesar salad should have parmesan cheese and croutans (if you really want croutans, roll your meatballs in italian breadcrumbs this will do hahaha ). Mine doesn't have croutans but definitely has parmesan. A parmesan bowls that will hold salad itself and a meatball.

Use a baking sheet topped with parchment paper or silicone mate. Place a tablespoon of grated cheese on the sheet leave spaces between each scoop. (If your parmesan is to dry, add a bit of easy melting cheese, that will help form the shape and wont cover the nutty parmesan flavor).


Place in the oven at 350° F ( 150° C), leave until cheese melts and forms a nice cheesy discs.
Take it out, let cool just enough to handle, before it cools totally and will be to hard to shape.


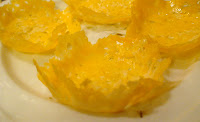
Wrap the discs around upsidedown standing muffin tin or a small shotglass. Let it cool completly this way and harden, forming a beautiful golden vessel.


When your little bowls are ready, is time to dress the salad! Fill each cheese cup with a spoonful of greens and top with luscious tiny meatball. Use the last bit of parsley, chop it and sprinkle on top. The crunchy bowl not only goes perfect with fresh green salad and a spicy meat, but is a perfect holder when you eat it.
enjoy!


ingredients:


chicken-squash salad in a wonton basket:
2 boneless, skinless chicken breasts
2 small size squash
2 garlic cloves
1 teaspoon fresh or dry ginger
2 tablespoons soy sauce
1/2 teaspoon crushed red peppers or fresh chili pepper
1 tablespoon vegetable oil
12 wonton wraps

Cut chicken breasts into small bite-size pieces, dry them with a paper towel so they brown good. In the large skillet on medium high heat, add oil, make it nice and hot, add minced garlic, red crushed peppers and freshly grated ginger. Don't let them burn, leave them just enough to release their natural oils, after 10 seconds or so, add your chicken and mix it well so the spices cover the meat. Let it brown for 5 mins. Mix from time to time. In the mean time wash and slice your zucchini, make the slices small and thin enough to go perfect with the bite size chicken pieces. Add veggies into the skillet with the nicely brown chicken stir in good, add soy sauce and let it steam for 1-2 min. Soy sauce will provide enough salt for this dish, but if you feel like is not enough for you, add a pinch more.


For the  little  wonton cups, take your muffin tin, grease it up and put the wonton wrappers inside. (If u don't find wonton wrappers, use toast bread slices, just trim the crust). Bake them for 5-7 min. in preheated oven at 350° F (160°C), until golden brown and firm. Take out and chill.


When ready, fill them with warm chicken-squash salad, its an Asian inspired appetizer, but easy and quick enough, anyone can make for any occasion.
Crisp, spicy full of flavor and low in calories, just can't say no to such a treat!